Pages

Thursday, February 27, 2014

Cornmeal Biscotti

Biscotti is the exception to my dried fruit rule and in case you're new to my blog my dried fruit rule is that I hate it. I actually don't mind dried fruit in biscotti because the whole freakin' thing is dry and crunchy so the chewy texture of the dried fruit doesn't get in the way of my experiencing something soft and fluffy.


These biscotti were made for my trip to NYC and are Gluten Free for my GFF and for the added benefit of ridding my cupboard of half a bag of corn meal and half a bag of almond flour.  Almond flour is apparently something I was afraid of running out of and bought way too much of.  This recipe also got rid of all the raisins in my pantry which are only there because Thomas Keller made me buy them.  Good riddens.  Every time I get to throw away an entire box or wash one and store of my plastic storage containers I'm practically giddy.


These biscotti are made in a way very similar to my favorite biscotti recipe.  Butter and sugar are creamed together (in this case brown sugar which gives them a more complex flavor), to that you add eggs and vanilla, followed by the dry ingredients and finally the mix ins.  For this application I chose to add raisins and walnuts because they were there. 


The finished dough gets smooshed into logs and baked, then sliced and baked again.
These taste really great - the raisins and walnuts work really well together and the variety of dry ingredients (cornmeal and almond flour) lend a much more unique flavor to this biscotti than comes from the traditional variety.

I only have one issue with this biscotti and it's my own fault and it, shockingly, has nothing to do with the raisins.  In fact it's only my issue because no one else complained about it and actually said they liked this particular attribute to the biscotti... they were too crunchy...

I know that sounds weird because biscotti are supposed to be crunchy.  Overall, the biscotti had the perfect level of crunchiness.  However, there were individual, crunchy grains of what I can only assume are cornmeal in here.  I know exactly what happened - the recipe says "fine" cornmeal and I had "coarse" cornmeal and I even paused for 1/2 a second and considered grinding my coarse cornmeal to be finer but then I decided that was too much work.  The first few bites I took, I was worried I'd lose a tooth but somehow I didn't and no one else did either.  Everyone dodged that bullet but I do recommend using "fine" cornmeal in this recipe to avoid tempting the dental Gods.


Cornmeal Biscotti
Adapted from The New York Times

Ingredients
1/2 cup Golden Raisins
1 cup Fine Cornmeal
1/2 cup Cornstarch
1 1/4 cup Almond Flour
2 tsp Baking Powder
1/4 tsp Salt
2 oz (1/4 cup) Butter, at room temperature
2/3 cup Brown Sugar
2 Eggs
1 1/2 tsp Vanilla Extract
3/4 cup chopped Walnuts

Instructions
Place the raisins in a bowl and cover with warm water.  Let sit for 10 minutes, then drain and set the raisins on paper towels. 

Preheat the oven to 300 degrees. Line a baking sheet with a silpat or parchment paper.

In a medium bowl, mix together the cornmeal, cornstarch, almond flour, baking powder and salt. 

In the bowl of an electric mixer fitted with the paddle attachment cream the butter and sugar for 2 minutes on medium speed. Scrape down the sides of the bowl and the beater with a rubber spatula and add the eggs and vanilla extract. Beat together on low speed until just combined. Scrape down the sides of the bowl and the beater. Add the flour mixture and beat at low speed until well blended. Add the walnuts and raisins and beat at low speed until mixed evenly through the dough. 

Divide the dough and shape into 2 wide, flat logs, about 10 inches long by 3 inches wide by 3/4 inch high. Make sure they are at least 2 inches apart on the baking sheet. Place in the oven on the middle rack and bake 50 minutes, until dry and firm. Remove from the oven and allow to cool for 30 minutes or longer. 

Place the logs on a cutting board and carefully cut into 1/2-inch thick slices. Place the slices, with one of the cut sides down, on the baking sheet and bake for another 10 minutes. Flip them over and bake for another 10 to 15 minutes, until the slices are dry and lightly browned. 

Enjoy!
Julie

Wednesday, February 26, 2014

Hash Brown Muffins

If you're not a sweets for breakfast person, don't let the name of these little guys fool you.  There is nothing sweet about these - they are savory and salty and cheesy and bacony.  Plus if you cheat like I did and use pre-shredded potatoes they're so freakin' easy to make.  Not to mention they're portable, can be made the night before and reheated (or if you're CA, reheated days later) and for all you gluten haters (or lovers who just can't) they're gluten free.


If you're being ambitious and shredding your own potatoes, good for you.  Do that.  After you're done, cook up a few strips of bacon. 
 Mix in some eggs, cheese, green onions, salt and pepper..


Put all that into a muffin tin.  I love my square muffin tin - it's my favorite to use for individual brownies, but it's perfect for these too.
My only concern with this type of thing is that it won't stay together.  I've had way too many experiences trying to get something out of a muffin tin and having it fall apart on me.  However, all the cheese and eggs in here guarantee hash brown stick-togetherness.

I made these to eat on a train ride to NYC for my GFF's birthday (and another special reason we'll talk about in a few days).  I wanted a savory breakfast option that was portable to fuel us through our big day of continuous eating (I'm pretty sure I didn't go two hours without eating the entire time I was there) - which makes no sense but somehow seemed necessary at the time. I baked them the night before and stuck them back in the oven to reheat in the morning while I was getting ready.  They were perfectly portable and absolutely delicious.  These are definitely going in the normal rotation for all breakfasts on the go. 

Hash Brown Muffins
Adapted from In Erika's Kitchen

Ingredients
3 cups shredded Potatoes (use pre-shredded or approx. 2 large Russett potatoes)
4 Eggs, lightly beaten
1 1/2 cups grated Cheddar Cheese
6 slices Bacon, cooked and crumbled
2 Green Onions, thinly sliced
1/8 tsp Salt
1/8 tsp Pepper

Instructions
Preheat the oven to 400 degrees.  Spray a 12 cup muffin tin (square or round) with non-stick cooking spray.

In a large bowl, combine the potatoes, eggs, 1 cup of cheese, bacon, green onions salt and pepper.  Divide the mixture evenly among the cups in the prepared pan.

Bake for 25 minutes.  remove the pan from the oven and top with the remaining 1/2 cup of cheese.  Return the pan to the oven and bake another 10 minutes.  Cool the muffins in the pan for 5 minutes and then carefully remove from the pan.

Serve warm or hot.  I made mine the night before and reheated them, wrapped in aluminum foil in a 300 degree oven for 30 minutes.

Enjoy!
Julie

Tuesday, February 25, 2014

Smoky Ketchup

It's hard for me to call this a recipe because it's just mixing three things together but I got a lot of complements when I served this with the Mini Corn Dog Muffins.  I made it again to serve with a batch of parsnip fries and figured I'd take a couple of photos and tell you about it.


I'm really into ketchup so I'm obviously really into kicking ketchup up a notch in the easiest possible way.

I first had this in a restaurant that always serves smoky ketchup with their french fries and once I had it I couldn't go to that restaurant without having french fries because I wanted the smoky ketchup.  I ended up asking what was in it and they told me the secret - Chipotle Peppers in Adobo Sauce.


The smoky ketchup in the restaurant was completely smooth so they either only used the sauce from the can of peppers or they blended it all up until it was smooth.  Either way, I like to mix in both the sauce and the chopped peppers into the ketchup to give it a really spicy and smoky flavor and a little bit of texture.


While this stuff is definitely great on French Fries, I love it on a lot of foods - Parsnip Fries, Hash Browns, Burgers - pretty much anything you'd put ketchup on will be infinitely better with smoky ketchup.

Smoky Ketchup

Ingredients
1/2 cup Ketchup
4 T Sauce from Chipotle Peppers in Adobo Sauce
2 Chipotle Peppers in Adobo Sauce, finely chopped

Instructions
Mix all of the ingredients together.

I told you it was easy.

Enjoy!
Julie

Monday, February 24, 2014

Baking Bouchon - Recipe 85: Garlic Comte Breadsticks

What a tease!  The first thing the description of these breadsticks says is "Cheez-Its are one of Matthew's favorite crackers."  Matthew is one of the head bakers at Bouchon Bakery.  Supposedly, these are a better version of those.  I do not agree.


Not because these aren't good.  They have a great cheesy flavor and the added interest of garlic oil, but these are nothing like Cheez-Its.  Cheez-Its are the best cheese crackers in the world.  I'm not overstating.  Goldfish are good, but Cheez-Its are better.  Cheese Nips are not even to be considered.  Cheez-Its are where it's at.

These are not Cheez-Its for 3 reasons.
  1. They are not crispy enough to be crackers.  They are softer, like breadsticks which makes sense because that's what they are.
  2. I'm pretty sure they don't use Comte cheese in Cheez-Its.  Comte is a French Gruyere cheese so, yeah, not in real Cheez-Its.
  3. They're totally the wrong color.  They look like regular breadsticks and aren't even one bit orange.  I like my cheese crackers orange.
Despite the fact that these are not Cheez-Its, they're pretty tasty little sticks and not that difficult to make.

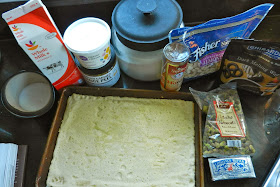
They're made like most of the other bread doughs using flour, salt, yeast and water that gets mixed together.  To that mixture you add melted Comte cheese and canola oil that's been cooked with garlic to flavor it.  All that gets kneaded together, allowed to rest for a few minutes and then rolled out into a large rectangle.  The dough is then frozen and cut into sticks.


Once the dough is cut, it proofs for a couple of hours and then gets baked.  I really wish I would have baked these longer.  I followed the instructions so I know I baked them for the appropriate amount of time, but I wish they have been crisper, like crackers (or Cheez-Its) because that is what I was expecting.  What I got were thin, soft breadsticks... not a bad thing, just not what I anticipated.

The garlic and cheese flavor does come through on these and they were very good.  CA took them to work and I think everyone there was relieved to receive treats that did not involve aggressive amounts of sugar.  I hope they enjoyed the break because it's all sugar all the time for a while.

Enjoy!
Julie

Sunday, February 23, 2014

Baking Bouchon - Recipe 84: Florentines

Florentines are one of the last recipes in the cookie chapter.  I still have a few more flavors of Macaroons to make (which I plan to make all at the same time because I'm a glutton for punishment) and then we can call this chapter done.


These are actually really interesting cookie bars and I'm going to tell you all about them but can we first talk about the term "nutmeats".  I've never seen this term before but it apparently means nuts that are out of their shell.  I see all sort of nuts out of their shell - walnuts, pecans, etc. - but I've never seen them referred to as nutmeats.  For some reason the pistachios I bought out of their shell were labeled nutmeats.  Am I the only one who is uncomfortable with this word?  I don't like that I've just typed it three times on my blog.  It kind of grosses me out.  Why can't we call them shelled nuts?
So, back to these bars... They start with a base layer of Pâte Sucreé which is essentially a sugar cookie.  That gets rolled out and baked.

Next up are a mixture of almonds, pistachios and candied orange peel that are swimming in a syrup made from milk, sugar, glucose, honey, butter and salt.

I was supposed to make my own candied orange peel for this recipe but it was such a pain in the rear last time I made the recipe in this cookbook that I decided to skip it.  While I've committed to making every recipe in the book, I did not commit to torture myself repeatedly.

The syrupy nut mixture goes on top of the Pâte Sucreé and gets baked until it's set and golden brown.
My favorite part of this process was flipping the entire thing over and spreading chocolate all over it. 


After the chocolate hardens you flip it over again and slice it into single servings.


These were pretty awesome!  I thought the combination of the candied orange peel and the chocolate would be weird but the orange peel is really subtle (so thank goodness I didn't spend hours making it) and nuts and chocolate is always a great combination.  They're also just a little bit salty but I love in baked goods.

I definitely think I'll make these again and can see using any combination of nuts.  The recipe suggests adding dried fruit as well but I think we all know how I feel about that.

Enjoy!
Julie

Thursday, February 20, 2014

Baking Bouchon - Recipe 83: Peppermint Patties

These are quite possibly the worst thing I've made all year.  I can't blame Thomas Keller entirely, although I find it entirely unrealistic to think that regular people should be expected to make these successfully.


There are all sorts of weird ingredients in these things and some of them are labeled "optional" which means I did not go out and buy Fondax or Invertase (?????) to use a tiny amount of them in this treat.  I also did not go out and buy Trimoline or Pouring/Icing Fondant because I can't find Trimoline anywhere and read that I could substitute corn syrup and I can't figure out what Pouring/Icing Fondant it.  I think its fondant that is really thin and therefore, pourable, but last time a recipe called for it I used this dry fondant and re-hydrated it which worked fine. I shouldn't have been surprised that this recipe didn't turn out - two omissions and two substitutions are not a recipe for success.
This recipe requires a sugar syrup that is mixed with the fondant and a little bit of peppermint oil.  The mixture is poured into a silcone mold and hardens into a little disk.

I had trouble finding peppermint oil in my local stores.  I thought I found it at Whole Foods.  When buying it I picked up the smallest bottle I could find and when I went to check out it wouldn't scan at the register.  The cashier was super nice and just stuck it in my bag.  When I got home I noticed two things.  (1) the bottle says "tester" on it - no wonder it wouldn't scan.  (2) it says "not for internal use" on it.  So, it appears that I bought peppermint essential oil that people use for all that holistic business and not for eating.  So, after all that I still had to order food grade peppermint oil online.

That's not the only trouble I ran into.  Because I only have one silicone mold, the recipe states that you should keep the remaining mixture warm over low heat and work in batches to create the little disks.  For some reason, the first batch of disks are the only ones that set up well.  The second batch did eventually but I had to refrigerate them to get them to harden.  Those ended up being super grainy.  I threw the rest away.
I did go ahead and cover everything that eventually hardened in chocolate but I bit into one of them and got a mouthful of grainy, pepperminty sugar and spit it out.  It was terrible.  I was like chewing a mouthful of sugar and gum at the same time.  Even chocolate couldn't save it.

I didn't even made CA try these and I certainly didn't torture either of our coworkers with them.

Enjoy!
Julie

Wednesday, February 19, 2014

Baking Bouchon - Recipe 82: Nanterre

Oh look, more bread.  In an effort to speed up the completion of the bread chapter of the Bouchon Bakery Cookbook I tackled two breads in a row.  I figured that because the last one was English Muffins it was more like breakfast than anything else so I could stand to make a non-breakfast bread.


You'll be happy to know that this bread didn't make me grumpy.  In fact, it made me pretty happy.  The cookbook recommends that this bread be used to make BLTs and you don't have to tell me to eat bacon twice.
This bread is actually brioche which is a bread enriched with butter and eggs which makes it much more tasty and interesting than regular bread.  The same method is used to make Sticky Buns and Hot Cross Buns.  Basically you make a regular bread dough and that has some eggs in it and knead in a crap load of butter.  Every time I've made the brioche recipe I don't believe that the butter will ever incorporate into the dough but after enough kneading with the dough hook it eventually does. 

Nanterre is a classic brioche shaped like a loaf.  I don't know why it's called that.  The internet revealed a city in France named Nanterre but I can't find any link between it and the name of the bread. 

The recipe makes two loaves of bread but I only have one regular sized loaf pan so I ended up making one regular sized loaf and two mini loaves. 

Forming the loaf is a bit different than you might expect, it's actually a series of little dough balls placed in the pan and proofed until they touch.  When they bake they all join together.  I was skeptical that this would actually happen but this bread proofs for three hours so it did happen eventually.

The loaves baked up really nicely and were golden brown.

Somewhere between proofing and baking my camera decided to only take pictures that look like you're on the surface of the sun.  My camera is really starting to annoy me.


My only complaint here is that I wish the bread had baked up a little taller than it did.  Not because I felt like it didn't rise enough but because I wanted to fit more bacon on it when I made my BLT.  Actually, mine was a BL because I'm not a big fan of raw tomatoes unless they're really good tomatoes.  CA is less picky about his tomatoes so I photographed his BLT.  I also do not eat mayonnaise because it's one of the most disgusting things on the planet so my BL contains Miracle Whip which is so much better.  CA hates Miracle Whip but likes mayonnaise.  He's weird.


Luckily, I was smart enough to realize that because the bread was shorter than desired, I had to make myself two BLT's.  That way I got my full daily allowance of bacon.

This bread was really great with the BLT.  The light and butter texture pairs really well with the salty bacon, crunchy lettuce and (I assume) the tomato.

Maybe I've turned a corner in the bread department.  There are some good ones coming up like cheese bread sticks and pretzels so I think I'm out of the woods.

Enjoy!
Julie

Tuesday, February 18, 2014

Baking Bouchon - Recipe 81: English Muffins

Now this is a bread I can get excited about!  You should be excited too because you don't have to hear me whine and moan about the latest bread recipe in this cookbook.  Maybe because it's a bread that is firmly engrained in the breakfast category and I love breakfast.  We buy English Muffins on a regular basis so making this is actually quite useful.


I've made English Muffins a few times before but the recipes were significantly different than this one.  The dough was always much thicker than this one and was formed into little patties, grilled on a griddle and then finished in the oven.  These were totally different.  Good thing because I have always been disappointed in my English Muffin attempts.  They never had enough nooks and crannies in them which is the crux of a good English Muffin.

The difference between this dough and the ones used for the other breads in this cookbook is the amount of levain in it.  There is more than double the amount in this bread that is in the others.  It also has more milk in it.  Both of these make the dough significantly thinner, more like batter than dough.  Because the dough is so thin, you can't form it into little bread loaves like the regular dough so it has to be baked in molds.  This meant another equipment purchase which I don't mind too much because I think I'll make these fairly often.


The dough rises and gets scooped into the molds and rises again.  I could tell even before I put them in the oven that there were a ton of little air bubbles in them which was very promising in the nooks and crannies department.
I was a little nervous when I cut open the English Muffins but inside I found a plethora of nooks and crannies.  Hooray!


I've been eating these things like mad.  I've eaten them with butter and jam, with just butter, with peanut butter, as a breakfast sandwich.  I refuse to give any of them away.  CA is lucky I gave him any because this is one bread I want to eat.


There are a few more breads left to make but so far these are my absolute favorite from the bread chapter.  I'm so glad that I got to make these because I think it's just the lift I needed to get through the rest of the breads.

Enjoy!
Julie

Monday, February 17, 2014

Baking Bouchon - Recipe 80: Mille-feuille

Guess what y'all...

It's been exactly one year since I started this little space of mine.  Can you believe it?

I can't.  It feels like yesterday until I look at the title of this post and realize I've made 80 recipes from the Bouchon Bakery Cookbook, not to mention the more than 200 other posts.  Are you all sick of me yet?

Too bad.  I'm having too much fun so I intend to stick around.


This dessert has a fancy French name but you probably know it by its American name - the Napolean.  It is essentially puff pastry layered with Mousseline cream which is a mixture of pastry cream and buttercream frosting.

Napoleans are really beautiful desserts with delicate layers of pastry and rich layers of cream that form a tower of deliciousness and I had high hopes for this one until the very end.
I did not document for you again how to make pastry cream or buttercream or puff pastry.  You are welcome to go back into the archives and relive it if you wish.

The pastry cream and buttercream get made separately and then whipped together.  All of that gets spread into a 9"x13" pan and frozen until its solid enough to be sliced into big rectangles.
The puff pastry dough gets rolled out and baked, however you have to weigh it down so it doesn't actually puff up.  Once it's baked and cooled you very carefully cut it into wedges.  I was super worried when I started cutting the pastry that it would disintegrate into a big crumbly mess but it help up pretty well.
Once you've got big rectangles of mousseline cream and puff pastry, they get stacked up. 

Thomas Keller's instructions say to turn the stacked pastry on its side because it's easier to slice it that way without it crumbling into bits.  It took me about 10 minutes to figure out that this is impossible.  It shouldn't have taken me 10 minutes.  I realized there was no way it was going to stick together enough to rotate it in about 10 seconds, but I spent another 9 minutes and 50 seconds staring at it wondering why Thomas Keller is so much smarter than me.


I gave up, left it vertical and topped it with sweetened whipped cream.  Despite the fact that I couldn't get my finished Napolean on its side I was still optimistic... and then I sliced it.


... and it fell over.

My Napolean was too tall said no one ever.


Despite the fact that my Napolean tilts like the Leaning Tower of Pisa it was pretty delicious.  The filling is rich and creamy and the pastry is flaky and delicate.  It's impossible to eat while maintaining any sort of dignity to wishing you were wearing a lobster bib but it does taste good.

Enjoy!
Julie

Sunday, February 16, 2014

Cocoa Nib Streusel Muffins

Remember when I made Carrot Muffins?  Remember how I totally screwed up the streusel topping and made way too much of it?  Here's my attempt to use it up along with some other stuff lying around.


Honestly, the last thing I needed was to make more stuff that I need to get rid of it.  I'm really starting to feel the pressure of finishing this cookbook and getting rid of all this food before we move.  I keep opening and closing the cupboards and flipping through my cookbook fretting.  And please don't get me started about the stress I feel when I see all the bread in my freezer.

Enough about the development of my first ulcer.

The base of them is a buttermilk muffin recipe from Williams Sonoma that is flavored with Apple Pie Spice.  The original recipe calls for cinnamon which would be totally fine here too, I just happen to have received a free sample jar of Penzey's Apple Pie Spice so I decided to use it.  You could sub Pumpkin Pie Spice too.

I just consulted the Internet as to what the difference is between Apple Pie Spice and Pumpkin Pie Spice is and the results are inconclusive.


The muffin batter in these is layered with a mixture of the streusel and cocoa nibs.  Cocoa nibs are the raw inside of the cocoa bean - if you ground them you'd get cocoa paste and if you mixed that with cocoa butter and sugar you'd have chocolate.  If you taste a cocoa nib you'd definitely know it was related to chocolate but it is a little bit bitter and almost a little nutty.  They're crunchy too which adds some great texture to the muffin.
These little guys were pretty interesting.  They're not super sweet but have the warm flavors of the apple pie spice and a hint of cocoa from the nibs.  The muffin itself is tender with a little bit of tang from the buttermilk.


Cooca Nib Struesel Muffins
Ingredients
7 T Butter, softened
2/3 cup Sugar
1 Egg
1 1/2 cup Flour
1 1/2 tsp Baking Powder
1/2 tsp Baking Soda
1/2 tsp Salt
1/2 tsp Apple Pie Spice (or Pumpkin Pie Spice)
1/2 cup Buttermilk
1 1/2 tsp Vanilla Extract
1 cup Streusel (see below)
1/2 cup Cocoa Nibs

Instructions
Preheat an oven to 350°F.  Spray a 12 cup muffin tin with non-stick spray.

In the bowl of an electric mixer fitted with the paddle attachment combine the butter and sugar and beat on medium speed until light and fluffy, about 5 minutes.. Add the egg and mix on low speed until just combined.

In another bowl, stir together the flour, baking powder, baking soda, salt and spices. Add to the butter mixture in 2 additions, alternating with the buttermilk and vanilla. Mix on low speed just until evenly moistened. The batter will be slightly lumpy.

In a small bowl, combine the streusel and cocoa nibs.

Spoon the half of the batter into the prepared muffin cups.  Sprinkle 1 T of the streusel/cocoa nib mixture into each cup.  Spoon the remaining batter into the muffin cups and top with the remaining streusel.

Bake until the muffins are golden, a toothpick inserted into the center of a muffin comes out clean, 20 to 25 minutes. Transfer the pan to a wire rack and let cool for 5 minutes before removing from the pan..

For the Streusel
1/3 cup Flour
1/3 cup Oatmeal
4 T cold Butter, cut into small pieces
2 T Brown Sugar
1/2 tsp Cinnamon

Mix all the ingredients in a small bowl with a pastry blender or a fork until uniform and crumbly.

Enjoy!
Julie