My camera battery died right when I started cooking so you get iPhone photos today. Sorry about that.
Comfort food is calling my name lately. All I want is chili and stew and mac and cheese and all things roasted and red wine and bourbon drinks. Falling leaves and CA building fires in the fireplace just make me want to curl up with something warm and comforting and there isn't anything more comforting than a bowl of chicken pot pie.
I did my best to load up the body of this chicken pot pie with veggies and to make the sauce with lighter ingredients too. This pie is filled with onion, celery, chicken, zucchini, peas and corn. I love the flavor that the mix of vegetables contributes to this recipe.
I also wanted to make sure that the chicken stayed nice and moist so I cooked the chicken by poaching it in stock. Then I used that stock as part of the base of the sauce which means that all that wonderful chicken flavor is trapped inside the pie... I just pictured myself trapped in a pie and eating my way out. That wouldn't be such a bad prison.
Despite what I consider to be excellent execution of the chicken pot portion of this chicken pot pie, I had some issues with the crust. One of my intentions in making the pot pie was to use up some of the puff pastry scraps I've been saving in my freezer. Typically when you make anything with puff pastry you end up with oddly shaped scraps and because of all the work it took for me to make all this puff pastry, I wasn't inclined to throw the in the trash so I've been collecting them.
Once I cooked the chicken and sauteed the veggies and made the sauce, I topped all that with my puff pastry scraps and stuck it in the oven expecting the pastry to rise above into a beautiful browned pastry crown. That did not happen.
Instead the pastry sunk into the base and didn't puff up or brown or anything. It simply turned into a soggy mess. I think this was because the pieces were so small - I'm pretty sure a large piece would have stood up to the test. However, I didn't have any large pieces of dough so I scraped the soggy unpuffed pastry disaster off the top and set aside my deliciously creamy chicken and veggie base. I then picked out a few more pastry scraps, put them on a baking sheet and baked them until they were beautifully browned and puffy. I really should have just done this in the first place because a ladle of that creamy base and a little puff pastry hat in a bowl was absolute comfort food perfection!
Therefore, I recommend (and have adjusted the recipe instructions below to reflect this) keeping your chicken pie and your pie crust separate until serving. It's best for everyone.
This recipe, as amended, is a really good one if I do say so myself. It is creamy without being too heavy and the chicken flavor really comes through thanks to the stock. I know what I'll be doing with the rest of the puff pastry scraps!
Chicken Pot Pie
6 servings
Ingredients
1 lb Boneless Chicken, breasts or thighs
2 cups Chicken or Vegetable Stock
1 T Olive Oil
1/2 Onion, finely diced (about 3/4 cup)
4 ribs Celery, chopped
3/4 cups Chopped Carrots
1/2 cup Corn (I used frozen)
1/2 cup Peas (I used frozen)
2 cloves Garlic, finely diced
1/3 cup Flour
1/4 cup White Wine
1 cup Milk (I used Skim)
1 tsp Thyme
1 tsp Salt
1/4 tsp Pepper
10 oz. Puff Pastry
Instructions
In a small pot, poach the chicken in the stock over low heat until the chicken is cooked through, about 30 minutes. Let the chicken cool completely in the stock. When the chicken is cool cut into bite sized pieces. Reserve the remaining stock.
Preheat the oven to 400 degrees. Spray a casserole dish with non-stick spray.
Heat the olive oil in a medium pot. Add the onions, celery and carrots. Saute until soft, about 10 minutes. Add the peas, corn and garlic and saute an additional 2 minutes until the garlic is fragrant. Add the flour and stir until thoroughly coating the vegetables. Cook 2 minutes. Add the wine and milk, thyme and one cup of the reserved stock. Cook until the sauce thickens, about 30 minutes. Add the cut up chicken and stir until combined. Pour the mixture into the prepared dish.
Cut the puff pastry into 6 equal portions. Place on a baking sheet.
Bake both the chicken mixture and the puff pastry at 400 degrees for 20-25 minutes, until the chicken mixture is bubbly and the pastry is browned and cooked through.
Spoon the chicken mixture into individual serving bowls and top with a piece of puff pastry.
Enjoy!
Julie
Monday, November 25, 2013
Sunday, November 24, 2013
Roasted Delicata Squash
The original recipe for this is titled Roasted Delicata Squash Fries. I find that to be a stretch, but I'm pretty picky about my fries. I appreciate that you can put ketchup on these if you want to (but, then again, you can put ketchup on almost anything) but I wouldn't go so far as to call them fries.
However, that does not mean that I'm not a huge fan of this recipe. I love all squashes - yellow, butternut, acorn, spaghetti, etc. but I can't remember having delicata squash before. You can find it in the bin at the grocery store with all the other squashes, it's long and stripey and hopefully has a sticker on it that tells you what it is.
I am officially renaming this the lazy man's squash AKA my new favorite squash because you don't have to peel it. Being able to eat the skin is amazing because peeling squash is a beast. I've broken three peelers trying to peel butternut squash which I believe is the ultimate test of a peeler. The ultimate test of my sanity is that I bought the same peeler three times only to break each one on a butternut squash before deciding to get a different kind of peeler. In my defense, before the peeler broke (3 times) it was the best peeler I ever owned. This new one isn't nearly as good, but it hasn't broken yet.
This recipe is embarrassingly easy (cut up squash, drizzle with olive oil, sprinkle with salt and pepper and bake) but I guess the whole point of this post is to tell you that if you're looking for a new squash pick up the delicata.
The flavor of these is really great - similar to butternut squash but not quite as sweet. The skin softens up and the roasting brings out their natural sweetness. I have a feeling this squash is going to make it into the regular rotation around here.
Roasted Delicata Squash
adapted from The Simple Veganista
Serves 4
Ingredients
2 Delicata Squash
1 T Olive Oil
1/2 tsp Salt
1/4 tsp Pepper
Sprinkle of Cayenne (optional)
Instructions
Preheat the oven to 500 degrees.
Cut each squash in half lengthwise. Scoop out the seeds. Cut into 1/2 inch slices.
Spread the squash in a single layer on a baking sheet. Drizzle with olive oil and sprinkle with salt and pepper. Use your hands to toss the squash to evenly distribute the olive oil and seasonings.
Bake for 10 minutes. Flip over each slice and bake for another 10 minutes until both sides are nicely browned.
Enjoy!
Julie
However, that does not mean that I'm not a huge fan of this recipe. I love all squashes - yellow, butternut, acorn, spaghetti, etc. but I can't remember having delicata squash before. You can find it in the bin at the grocery store with all the other squashes, it's long and stripey and hopefully has a sticker on it that tells you what it is.
I am officially renaming this the lazy man's squash AKA my new favorite squash because you don't have to peel it. Being able to eat the skin is amazing because peeling squash is a beast. I've broken three peelers trying to peel butternut squash which I believe is the ultimate test of a peeler. The ultimate test of my sanity is that I bought the same peeler three times only to break each one on a butternut squash before deciding to get a different kind of peeler. In my defense, before the peeler broke (3 times) it was the best peeler I ever owned. This new one isn't nearly as good, but it hasn't broken yet.
This recipe is embarrassingly easy (cut up squash, drizzle with olive oil, sprinkle with salt and pepper and bake) but I guess the whole point of this post is to tell you that if you're looking for a new squash pick up the delicata.
The flavor of these is really great - similar to butternut squash but not quite as sweet. The skin softens up and the roasting brings out their natural sweetness. I have a feeling this squash is going to make it into the regular rotation around here.
Roasted Delicata Squash
adapted from The Simple Veganista
Serves 4
Ingredients
2 Delicata Squash
1 T Olive Oil
1/2 tsp Salt
1/4 tsp Pepper
Sprinkle of Cayenne (optional)
Instructions
Preheat the oven to 500 degrees.
Cut each squash in half lengthwise. Scoop out the seeds. Cut into 1/2 inch slices.
Spread the squash in a single layer on a baking sheet. Drizzle with olive oil and sprinkle with salt and pepper. Use your hands to toss the squash to evenly distribute the olive oil and seasonings.
Bake for 10 minutes. Flip over each slice and bake for another 10 minutes until both sides are nicely browned.
Enjoy!
Julie
Labels:
Gluten Free,
Savory
Thursday, November 21, 2013
Zucchini Fritters
CA has been complaining that we eat the same boring vegetables all the time. I'll admit that we eat a lot of roasted broccoli, roasted brussels sprouts, sauteed squash and steamed green beans. However, in my defense, during the week I don't have a lot of time to come up with some new and creative vegetable dish. Plus, on weekdays I try my best to eat in a healthy way (don't judge a girl's health status by her blog posts) and the simplest vegetable dishes often have the least calories and allow me to stuff large amounts of them in my face so that I'm full and don't eat a lot of more unhealthy items. I'm no fun when I'm hungry.
To appease his veggie boredom, I decided to make zucchini fritters on this particular weekEND night.
I looked at at least 10 recipes online and then closed the laptop and decided to wing it. It turns out there is a LOT of water in zucchini so the common theme in all of the recipes I read was that you have to get as much water as possible out of the zucchini or you'll end up with a soggy mess.
I wanted to keep things simple so the only flavorings I added to the fritters were salt and pepper and sauteed onions. Oh yeah, and a little cheese because you can't have fritters without cheese. It's a rule that I just made up.
The fritters get fried up in a little bit of oil.
The verdict? CA loved these. He thought they were like the zucchini version of creamed spinach. Not quite what I was going for, but if he's happy, I'm happy... especially considering I made these for him.
Me? I thought the flavor was really good but I wanted them to be crispier. I think the lack of crunch is a function of me not squeezing enough water out of the zucchini. Squeeze that zucchini like your life depends on it.
Zucchini Fritters
Yields 6-8 Fritters
Ingredients
3 Medium Zucchini
1/2 onion, finely chopped (about 1/2 cup)
1 T + 1/2 cup Canola Oil, divided
1/4 cup grated Parmesan Cheese
1 Egg
1/4 cup Flour
3/4 tsp Salt
1/4 tsp Pepper
Instructions
Grate the zucchini, wrap it in three layers paper towels and squeeze to release the water. You'll have to repeat the process a few times to remove as much water as possible. Add the zucchini to a medium mixing bowl.
Heat 1 tablespoon of oil in a non-stick skillet over medium heat. Add the onion and saute until soft, about 5 minutes. Add the cooked onion to the mixing bowl.
Add the cheese, egg, flour, salt and pepper to the mixing bowl and mix well. Gently form the zucchini mixture into 6-8 patties, about 1/2" thick.
Heat the remaining canola oil in the same nonstick skillet over medium heat. Working in batches, fry the patties in hot oil until browned and crisp, 3-4 minutes per side.
Transfer the fritters to paper towels to let drain.
Enjoy!
Julie
To appease his veggie boredom, I decided to make zucchini fritters on this particular weekEND night.
I looked at at least 10 recipes online and then closed the laptop and decided to wing it. It turns out there is a LOT of water in zucchini so the common theme in all of the recipes I read was that you have to get as much water as possible out of the zucchini or you'll end up with a soggy mess.
I wanted to keep things simple so the only flavorings I added to the fritters were salt and pepper and sauteed onions. Oh yeah, and a little cheese because you can't have fritters without cheese. It's a rule that I just made up.
The fritters get fried up in a little bit of oil.
The verdict? CA loved these. He thought they were like the zucchini version of creamed spinach. Not quite what I was going for, but if he's happy, I'm happy... especially considering I made these for him.
Me? I thought the flavor was really good but I wanted them to be crispier. I think the lack of crunch is a function of me not squeezing enough water out of the zucchini. Squeeze that zucchini like your life depends on it.
Zucchini Fritters
Yields 6-8 Fritters
Ingredients
3 Medium Zucchini
1/2 onion, finely chopped (about 1/2 cup)
1 T + 1/2 cup Canola Oil, divided
1/4 cup grated Parmesan Cheese
1 Egg
1/4 cup Flour
3/4 tsp Salt
1/4 tsp Pepper
Instructions
Grate the zucchini, wrap it in three layers paper towels and squeeze to release the water. You'll have to repeat the process a few times to remove as much water as possible. Add the zucchini to a medium mixing bowl.
Heat 1 tablespoon of oil in a non-stick skillet over medium heat. Add the onion and saute until soft, about 5 minutes. Add the cooked onion to the mixing bowl.
Add the cheese, egg, flour, salt and pepper to the mixing bowl and mix well. Gently form the zucchini mixture into 6-8 patties, about 1/2" thick.
Heat the remaining canola oil in the same nonstick skillet over medium heat. Working in batches, fry the patties in hot oil until browned and crisp, 3-4 minutes per side.
Transfer the fritters to paper towels to let drain.
Enjoy!
Julie
Labels:
Savory
Wednesday, November 20, 2013
Baking Bouchon - Recipe 67: Almond Croissants
This is last in the series of croissants and yet another one I haven't eaten before. I must not be eating enough croissants. Not that it's an issue now because I've eaten more croissants in the last 48 hours than I've eaten in the last five years. (That was written with a big ole' grin on my face.)
I am pleased that Thomas gave these an everyday name, even if they are subtitled in French as Croissants aux Amandes, because the simplicity of them matches the plainer name. That is not to say that they're not wonderful... sometimes simpler is better.
There are four components to these croissants.
1. A traditional croissant - self explanatory
2. Almond Syrup - almond flour steeped in sugar water then strained to create a lovely almond flavored syrup. It would have been far easier to flavor simple syrup with almond extract but I have a feeling that almond extract isn't stocked in the Bouchon Bakery's pantry.
3. Almond Cream - which I've made several times before (it's prominently featured in the Pear Feuillette and Plum Tarts). It is a combination of almond flour, regular flour, butter, powdered sugar and eggs that is whipped together into a fluffy almond flavored pastry cream.
4. Sliced almonds - also self explanatory.
Assembly works as follows... the croissants are sliced in half, both sides are brushed with almond syrup, almond cream is spread on one side of the croissant and topped with the other, a small amount of cream is spread on top and then the top is sprinkled with almonds. All that gets baked for a bit to seal it all together and toast the almonds.
These emerged from the oven with beautifully toasted almonds on top and my house smelled like almond deliciousness.
I'm a huge fan of these. They're got the same buttery flavor and flaky texture of traditional croissants with a rich almond flavor. The cream inside kind of melts into the croissants when it's baked so it's one cohesive treat. The almonds on top just add a bit of crunch and texture. They're delightful!
I have a very hard time deciding which of the croissants were my favorite. The raisin version is out of the running for obvious reasons. The traditional croissants are the breakfast winner, but I'm torn between the almond and chocolate for dessert. I was really surprised by how much I like the almond version. When I worked in the bakery we made almond croissants very similar to these and they never appealed to me so I never ate them. I wonder if they were this delicious. Maybe I need to go back and try them... but then I'll probably just get lured in by quiche and scones.
Enjoy!
Julie
I am pleased that Thomas gave these an everyday name, even if they are subtitled in French as Croissants aux Amandes, because the simplicity of them matches the plainer name. That is not to say that they're not wonderful... sometimes simpler is better.
1. A traditional croissant - self explanatory
2. Almond Syrup - almond flour steeped in sugar water then strained to create a lovely almond flavored syrup. It would have been far easier to flavor simple syrup with almond extract but I have a feeling that almond extract isn't stocked in the Bouchon Bakery's pantry.
3. Almond Cream - which I've made several times before (it's prominently featured in the Pear Feuillette and Plum Tarts). It is a combination of almond flour, regular flour, butter, powdered sugar and eggs that is whipped together into a fluffy almond flavored pastry cream.
4. Sliced almonds - also self explanatory.
Assembly works as follows... the croissants are sliced in half, both sides are brushed with almond syrup, almond cream is spread on one side of the croissant and topped with the other, a small amount of cream is spread on top and then the top is sprinkled with almonds. All that gets baked for a bit to seal it all together and toast the almonds.
These emerged from the oven with beautifully toasted almonds on top and my house smelled like almond deliciousness.
I'm a huge fan of these. They're got the same buttery flavor and flaky texture of traditional croissants with a rich almond flavor. The cream inside kind of melts into the croissants when it's baked so it's one cohesive treat. The almonds on top just add a bit of crunch and texture. They're delightful!
I have a very hard time deciding which of the croissants were my favorite. The raisin version is out of the running for obvious reasons. The traditional croissants are the breakfast winner, but I'm torn between the almond and chocolate for dessert. I was really surprised by how much I like the almond version. When I worked in the bakery we made almond croissants very similar to these and they never appealed to me so I never ate them. I wonder if they were this delicious. Maybe I need to go back and try them... but then I'll probably just get lured in by quiche and scones.
Enjoy!
Julie
Labels:
Breakfast
Tuesday, November 19, 2013
Baking Bouchon - Recipe 66: Pains aux Raisins
Despite its pretentious name, these are raisin croissants. If I hadn't committed to making everything in this book, I would not have made these. Must we rehash my dislike of raisins? Let's not.
The croissant dough here is the same as traditional and chocolate croissants. You actually use half a batch of croissant dough to make these ten pastries. The dough gets rolled out and spread with a thin layer of pastry cream which I whipped up the day before. Having made the pastry cream a half dozen times now, I'm finally getting the hang of it and this was best best batch yet. On top of the pastry cream goes a boatload of raisins....
Sigh...
Ugh...
I used golden raisins because that's what we had in the house and they are slightly less repulsive than purple raisins. The only redeeming quality about these raisins is that they are soaked in a rum simple syrup. Rum makes them slightly less offensive.
All of that gets rolled up and sliced into individual portions - kind of like a cinnamon roll. The rolls get brushed with egg wash and proofed for a couple of hours.
These baked up light and golden and quite pretty. I ate a bite of one to tell you that I did. It wasn't terrible, but I didn't eat any more. CA ate them for breakfast and liked them, but even he admitted this wasn't his favorite of the croissant quad.
I sent most of these away. The photo below reflects how my kitchen counter typically looks on Sunday nights as I'm sorting baked goods into keep and give away containers for two workplaces. Don't you wish you worked with us?
I'm so grateful there is one more croissant recipe to share with you so that we don't have to end on a shriveled up sour note.
Enjoy!
Julie
The croissant dough here is the same as traditional and chocolate croissants. You actually use half a batch of croissant dough to make these ten pastries. The dough gets rolled out and spread with a thin layer of pastry cream which I whipped up the day before. Having made the pastry cream a half dozen times now, I'm finally getting the hang of it and this was best best batch yet. On top of the pastry cream goes a boatload of raisins....
Sigh...
Ugh...
I used golden raisins because that's what we had in the house and they are slightly less repulsive than purple raisins. The only redeeming quality about these raisins is that they are soaked in a rum simple syrup. Rum makes them slightly less offensive.
All of that gets rolled up and sliced into individual portions - kind of like a cinnamon roll. The rolls get brushed with egg wash and proofed for a couple of hours.
These baked up light and golden and quite pretty. I ate a bite of one to tell you that I did. It wasn't terrible, but I didn't eat any more. CA ate them for breakfast and liked them, but even he admitted this wasn't his favorite of the croissant quad.
I sent most of these away. The photo below reflects how my kitchen counter typically looks on Sunday nights as I'm sorting baked goods into keep and give away containers for two workplaces. Don't you wish you worked with us?
I'm so grateful there is one more croissant recipe to share with you so that we don't have to end on a shriveled up sour note.
Enjoy!
Julie
Labels:
Breakfast
Monday, November 18, 2013
Baking Bouchon - Recipe 65: Pains au Chocolat
What's better than light, flaky, buttery croissants? Those same croissants with chocolate.
I never pick chocolate croissants when I'm hitting up a bakery for breakfast. I actually can't remember ever eating a chocolate croissant, although it can't possibly be true that I've never had one. I'll usually opt for a muffin or scone if I'm going for a sweet breakfast pastry. I'm not a chocolate for breakfast kind of girl.
These facts haven't changed, but I am now obsessed with chocolate croissants... for dessert.
Yesterday we went through the whole croissant dough making process, the whole butter block encasing process and the whole rollin', rollin', rollin' process. Today we get to skip right over that because chocolate croissants (I can't call them pains au chocolat like Thomas Keller does because it's too pretentious and while I am a food snob I try my best not to be pretentious) are made exactly the same way as regular croissants until it comes to the cutting and rolling part.
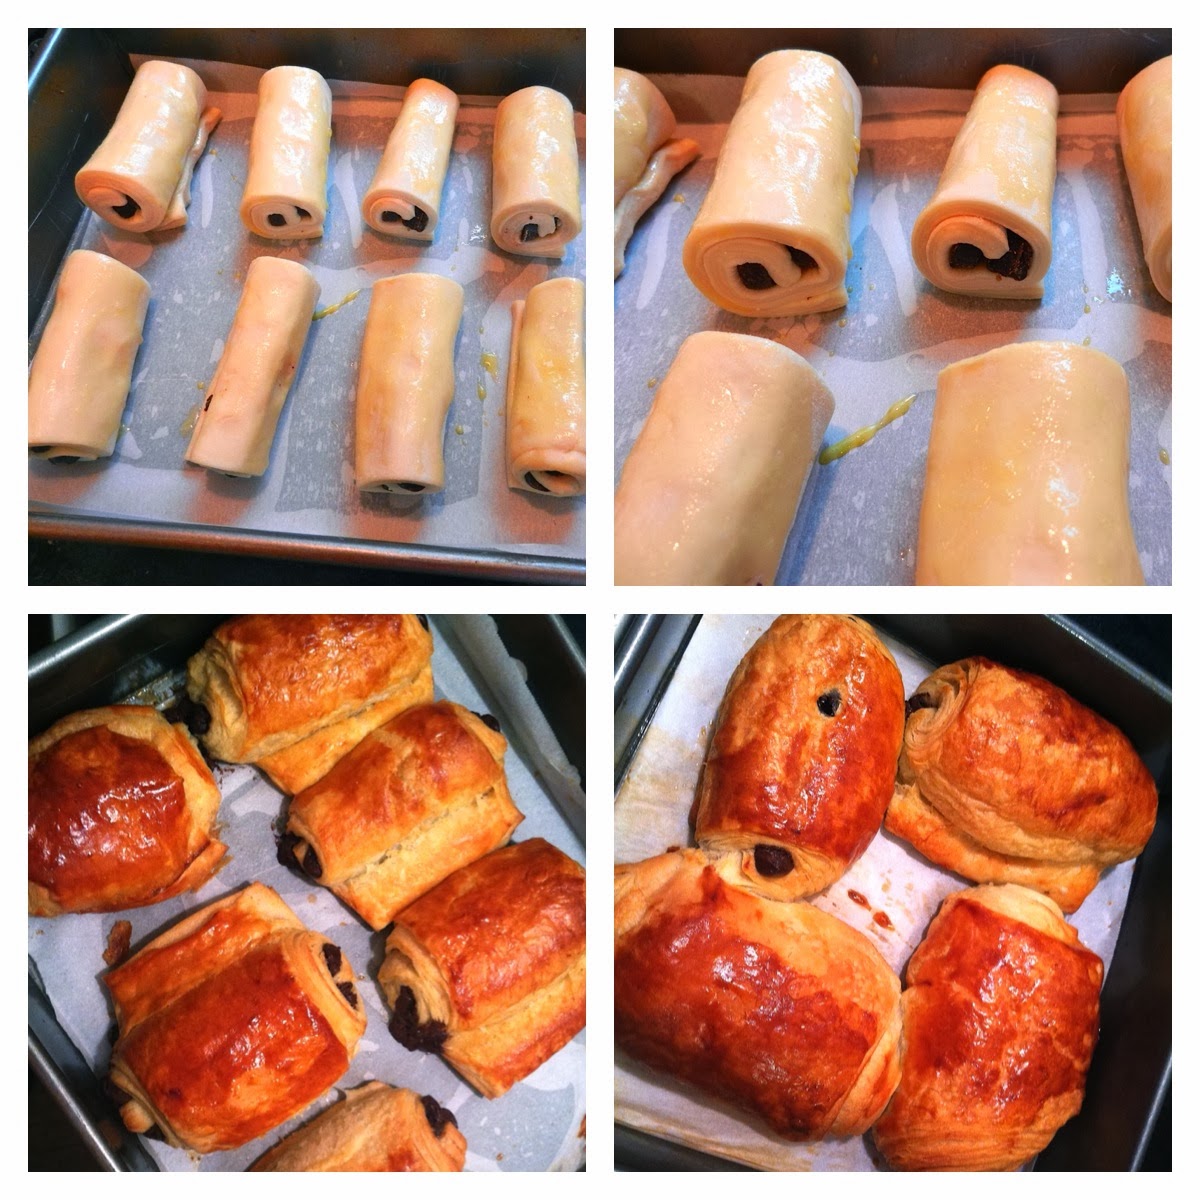
For these the dough gets rolled out and cut into rectangles. Each rectangle gets a chocolate baking stick and a brush of egg wash to help it stick together. The chocolate is semi-sweet so it's not crazy sweet which I appreciate (especially if you do opt to eat these at breakfast). I couldn't find the sticks in my local stores so I ordered them online at King Arthur Flour. My only word of advice is not to order them when it's hot outside. Not that I know anything about that. All that gets rolled up into a pretty little log.
By the way, if you want to cheat and make easy chocolate croissants - just roll one of these sticks up inside a crescent roll. Done. Heck, just put some chocolate chips in there. I, however, like to make things more difficult.
The rolls get brushed with more egg wash and proofed for a couple of hours. Then they go straight into the oven. Because I baked the regular croissants first, I knew I wouldn't have any trouble with these so I didn't stalk the oven window during the baking process.
The result is a beautifully browned, light, flaky, buttery pastry that envelopes a creamy, slightly sweet chocolate center. These are amazing and totally worth all the work.
My only minor complaint is that some of them unrolled a little bit during the baking process so they're not all tight little rounds, but I'm full of aesthetic forgiveness when something tastes this good.
I can't say that I've been converted to a chocolate croissant for breakfast type of person because I was so busy eating regular croissants for breakfast to eat these at the same time. I did however eat them for dessert for a few days and was a huge fan.
Enjoy!
Julie
I never pick chocolate croissants when I'm hitting up a bakery for breakfast. I actually can't remember ever eating a chocolate croissant, although it can't possibly be true that I've never had one. I'll usually opt for a muffin or scone if I'm going for a sweet breakfast pastry. I'm not a chocolate for breakfast kind of girl.
These facts haven't changed, but I am now obsessed with chocolate croissants... for dessert.
Yesterday we went through the whole croissant dough making process, the whole butter block encasing process and the whole rollin', rollin', rollin' process. Today we get to skip right over that because chocolate croissants (I can't call them pains au chocolat like Thomas Keller does because it's too pretentious and while I am a food snob I try my best not to be pretentious) are made exactly the same way as regular croissants until it comes to the cutting and rolling part.
For these the dough gets rolled out and cut into rectangles. Each rectangle gets a chocolate baking stick and a brush of egg wash to help it stick together. The chocolate is semi-sweet so it's not crazy sweet which I appreciate (especially if you do opt to eat these at breakfast). I couldn't find the sticks in my local stores so I ordered them online at King Arthur Flour. My only word of advice is not to order them when it's hot outside. Not that I know anything about that. All that gets rolled up into a pretty little log.
By the way, if you want to cheat and make easy chocolate croissants - just roll one of these sticks up inside a crescent roll. Done. Heck, just put some chocolate chips in there. I, however, like to make things more difficult.
The result is a beautifully browned, light, flaky, buttery pastry that envelopes a creamy, slightly sweet chocolate center. These are amazing and totally worth all the work.
My only minor complaint is that some of them unrolled a little bit during the baking process so they're not all tight little rounds, but I'm full of aesthetic forgiveness when something tastes this good.
I can't say that I've been converted to a chocolate croissant for breakfast type of person because I was so busy eating regular croissants for breakfast to eat these at the same time. I did however eat them for dessert for a few days and was a huge fan.
Enjoy!
Julie
Labels:
Breakfast
Sunday, November 17, 2013
Baking Bouchon - Recipe 64: Traditional Croissants
Croissants are one of the reasons I decided to bake my way through the Baking Bouchon cookbook. I've always wanted to make them but I figured they were way too difficult. I thought that about puff pastry too which I've successfully executed (kind of) and this is fundamentally the same thing (butter wrapped in dough, rolled and folded to create layers) so I had a lot of confidence going into this recipe.
I know we just got off 2 whole weeks on the same theme and you were expecting variety to make a comeback here this week but when I decided it was time to make croissants I went all in and made all four kinds of croissants in the cookbook at the same time. The process of folding and rolling the dough takes a lot of time and I decided it was easier to do it all at once. Therefore, you get 4 days of croissants.
We start at the beginning with the classic croissant. The dough for all four types of croissants is made the same way but some recipes call for less dough than others, so I made 3 batches.
It starts with a poolish, which we've discussed when making bread. It turns out that croissant dough is more like bread dough than pastry dough because it contains yeast which contributes to the rise (as opposed to puff pastry which gets its height only from the layers).
The poolish, or starter, is made from flour, yeast and water which is left at room temperature for 12-15 hours so the yeast have time to get all bubbly and active.
The rest of the ingredients in the dough are more flour, more yeast, more water, a little sugar, a little butter, a little salt and teaspoon of diastatic malt powder. I've been trying not to go nuts buying random ingredients, particularly those that I only need a teaspoon of, but I wanted these croissants to be perfect so I ordered this powder on the Internet. (King Arthur Flour has been a good resource for me for all kinds of random baking things.) I didn't do any research on this stuff but the label says it makes breads have better crust, rise and texture. I'm sure this has to do with science and theirs is not to reason why.
The dough gets kneaded in the stand mixer for twenty minutes. Because I made 3 batches at the same time, this meant that my mixer was running for an hour which meant that it was really freakin' hot. I was worried it would die (it's been making straining sounds every since I overloaded it with so much cookie dough it couldn't move) that I kept putting cold washcloths on it like it had typhoid. CA said it was a really smart idea and considering it didn't start smoking, I guess it helped.
The dough then rises for an hour, is rolled in to a rectangle and frozen for 20 minutes until it's nice and firm.

Next up is the butter block where I take three sticks of butter and make them into one giant butter pat which is awesome. It involves pounding it and rolling it until it's stuck together and then trimming it and rolling again to get a nice rectangle. The butter block gets chilled again to make sure it's nice and firm
Now it's time to encase the butter in dough so you roll the dough out into a nice long rectangle, place the butter in the middle and wrap it up like a butter gift. I might be the only person who would love to unwrap a box of butter. I also wouldn't mind be wrapped in a dough blanket either.
Next comes hours of chilling the dough, rolling it out into a long thin rectangle and folding it into thirds. This process gets repeated 3 times for 3 batches of dough so 9 times. Oh yeah, and then you roll it out again before you cut it so let's make that 12 times. Needless to say that my hands hurt. Embarrassingly my abs hurt. If you ever want evidence that you're out of shape you should get sore abs from baking. It's ridiculous.
Did I tell you it took me 3 days to make all these?
Now that I'm thoroughly exhausted just remembering the rolling process, it's time to shape these into croissant shapes.
For the traditional croissant shape the dough is cut into triangles. The triangles get stretched lengthwise and rolled into crescents. Thomas tucks in the ends of the bottom of each triangle on his croissants before rolling instead of wrapping them around the front of the croissant. I have no feelings either way about this.

The rolled croissants are then brushed with egg wash and left to proof for 2 hours. This happened on my dining room table on every baking pan I have in the house because I don't have enough sheet pans to hold 50 croissants. It's times like this that I like to point out to CA that I actually do need more kitchen equipment.
The instructions in this cookbook don't indicate what the proofed dough should look like, just that an impression should remain if the dough is pressed gently. I waited for the croissants to really rise and get bigger but that never really happened so a few hours later I decided it was time to go ahead and bake them.
The croissants get brushed with egg wash again (there's no way these guys won't get golden brown) and popped into the oven.
I spent the majority of the 40 minute baking time staring through the window of the oven. I was so nervous that they wouldn't turn out right but they were freaking beautiful!!!!
Not only were they beautiful but they taste amazing too - just as good as something you'd buy in a bakery. I couldn't be prouder of these guys. They shatter when you break them apart just like you want a flaky croissant to do. They're light and taste amazing by themselves or with a little butter and jam.
CA and I ate a lot of them, took a lot to work and also froze a few for future enjoyment. People actually asked if we bought them which I took as a compliment.
Can you tell that I'm proud of myself? Well, I am.
Variations on this theme continue tomorrow. Did someone say chocolate?
Enjoy!
Julie
I know we just got off 2 whole weeks on the same theme and you were expecting variety to make a comeback here this week but when I decided it was time to make croissants I went all in and made all four kinds of croissants in the cookbook at the same time. The process of folding and rolling the dough takes a lot of time and I decided it was easier to do it all at once. Therefore, you get 4 days of croissants.
We start at the beginning with the classic croissant. The dough for all four types of croissants is made the same way but some recipes call for less dough than others, so I made 3 batches.
The poolish, or starter, is made from flour, yeast and water which is left at room temperature for 12-15 hours so the yeast have time to get all bubbly and active.
The rest of the ingredients in the dough are more flour, more yeast, more water, a little sugar, a little butter, a little salt and teaspoon of diastatic malt powder. I've been trying not to go nuts buying random ingredients, particularly those that I only need a teaspoon of, but I wanted these croissants to be perfect so I ordered this powder on the Internet. (King Arthur Flour has been a good resource for me for all kinds of random baking things.) I didn't do any research on this stuff but the label says it makes breads have better crust, rise and texture. I'm sure this has to do with science and theirs is not to reason why.
The dough gets kneaded in the stand mixer for twenty minutes. Because I made 3 batches at the same time, this meant that my mixer was running for an hour which meant that it was really freakin' hot. I was worried it would die (it's been making straining sounds every since I overloaded it with so much cookie dough it couldn't move) that I kept putting cold washcloths on it like it had typhoid. CA said it was a really smart idea and considering it didn't start smoking, I guess it helped.
The dough then rises for an hour, is rolled in to a rectangle and frozen for 20 minutes until it's nice and firm.
Next up is the butter block where I take three sticks of butter and make them into one giant butter pat which is awesome. It involves pounding it and rolling it until it's stuck together and then trimming it and rolling again to get a nice rectangle. The butter block gets chilled again to make sure it's nice and firm
Now it's time to encase the butter in dough so you roll the dough out into a nice long rectangle, place the butter in the middle and wrap it up like a butter gift. I might be the only person who would love to unwrap a box of butter. I also wouldn't mind be wrapped in a dough blanket either.
Next comes hours of chilling the dough, rolling it out into a long thin rectangle and folding it into thirds. This process gets repeated 3 times for 3 batches of dough so 9 times. Oh yeah, and then you roll it out again before you cut it so let's make that 12 times. Needless to say that my hands hurt. Embarrassingly my abs hurt. If you ever want evidence that you're out of shape you should get sore abs from baking. It's ridiculous.
Did I tell you it took me 3 days to make all these?
Now that I'm thoroughly exhausted just remembering the rolling process, it's time to shape these into croissant shapes.
For the traditional croissant shape the dough is cut into triangles. The triangles get stretched lengthwise and rolled into crescents. Thomas tucks in the ends of the bottom of each triangle on his croissants before rolling instead of wrapping them around the front of the croissant. I have no feelings either way about this.

The rolled croissants are then brushed with egg wash and left to proof for 2 hours. This happened on my dining room table on every baking pan I have in the house because I don't have enough sheet pans to hold 50 croissants. It's times like this that I like to point out to CA that I actually do need more kitchen equipment.
The instructions in this cookbook don't indicate what the proofed dough should look like, just that an impression should remain if the dough is pressed gently. I waited for the croissants to really rise and get bigger but that never really happened so a few hours later I decided it was time to go ahead and bake them.
The croissants get brushed with egg wash again (there's no way these guys won't get golden brown) and popped into the oven.
I spent the majority of the 40 minute baking time staring through the window of the oven. I was so nervous that they wouldn't turn out right but they were freaking beautiful!!!!
Not only were they beautiful but they taste amazing too - just as good as something you'd buy in a bakery. I couldn't be prouder of these guys. They shatter when you break them apart just like you want a flaky croissant to do. They're light and taste amazing by themselves or with a little butter and jam.
CA and I ate a lot of them, took a lot to work and also froze a few for future enjoyment. People actually asked if we bought them which I took as a compliment.
Can you tell that I'm proud of myself? Well, I am.
Variations on this theme continue tomorrow. Did someone say chocolate?
Enjoy!
Julie
Labels:
Breakfast
Subscribe to:
Posts (Atom)