Thursday, November 28, 2013

Peanut Butter Candy Bar Cookies

It's hard to believe that I've posted five savory food posts since the last sugar filled post.  Some people might think that's a good thing but I think it's terrible.  Consider it rectified because there's a lot of sweets coming at you in the next few days.

We live in a neighborhood with a ton of kids.  Last year was our first Halloween in this neighborhood and, luckily, our neighbors warned us that we would get a ton of trick-or-treaters and to stock up on candy.  We bought a ton and gave out every piece of it (aside from the few I set aside for us to eat).  This year I expected the same and bought another ton of candy but the stream of candy hungry kiddos was not as robust as we had last year.  It was a little rainy out so maybe some kids called it quits early (althought I don't remember that stopping me when I was a kid) but regardless of the reason I was left with a crapload of leftover Halloween candy.  Luckily, I noticed that the candy wasn't disappearing as quickly as it did last year and started giving out extra, especially the sugar candy.  I knew that if I could at least get rid of the sugar candy, I would find something to do with all the chocolate.  This is not a house in which chocolate is wasted.


CA has been doing his duty in eating the leftovers.  I've come downstairs a few times in the last week to piles of candy wrappers on the dining room table or in the trash can... primarily of the Reese's Peanut Butter Cup variety (I don't think I'll need to bake anything with Reese's cups!).  However, there's no way anyone can eat all this candy.  Their teeth would rot off before they were done.  Instead of paying into the college fund of our dentist's children, I've baked a lot of it into treats.


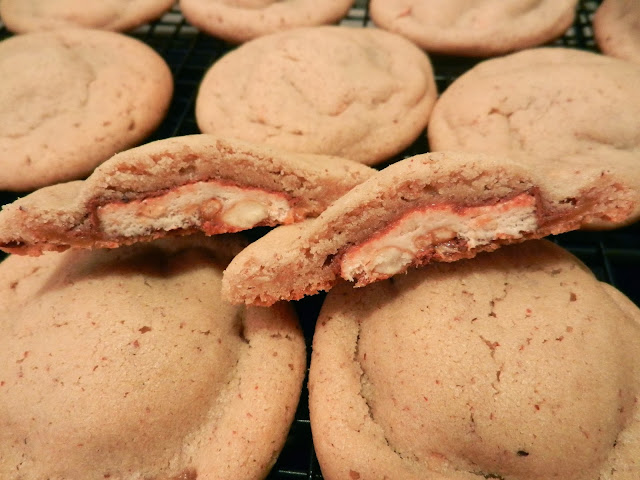
The first (and my favorite so far) of the candy treats are these peanut butter cookies with candy centers. 

The peanut butter cookie base is pretty standard - butter, peanut butter, white and brown sugar, eggs, vanilla, flour, baking powder and baking soda mixed together in the standard cookie making way... cream butter and PB with the sugars, add eggs and vanilla, add dry stuff.  Done.

The original recipe calls for a cup of creamy peanut butter.  Shockingly, I did not have a full cup of peanut butter in my house so I used half PB and half almond butter.  You can substitute nut butters for each other pretty consistently in recipes - it will taste differently but they all react the same during the baking process.  In addition to the peanut butter shortage, I also only had crunchy PB, not creamy.  If you don't mind a little crunch in your cookie you can always make this substitution as well.

The fun part of these cookies comes in the form of the candy surprise inside each one.  I had an assortment of mini candy bar options so I used both Milky Way and Snickers bars.  Once they're wrapped up you have no way of knowing which is inside so not only does the presence of the bar surprise you but which bar is also a surprise. 

These bake up really nicely with a little mound in the middle that hints to a surprise inside (except for the ones I did a terrible job of covering and the surprise is a bit prematurely revealed).


I love these little guys.  They remind me of peanut butter blossoms (those peanut butter cookies with the Hershey Kiss on top) except that the chocolate is hidden and has a little extra oomph from the extra ingredients inside the candy bar.  The cookies is soft and chewy, just like I like 'em.


Peanut Butter Candy Bar Cookies

adapted from Your Homebased Mom

Ingredients
1 cup Butter, at room temperature
1 cup Peanut Butter or other Nut Butter (I used 1/2 PB and 1/2 Almond Butter
1 cup Sugar
1 cup Brown Sugar
2 Eggs
2 tsp Vanilla Extract
3 cups All Purpose Flour
1 tsp Baking Soda
1 tsp Baking Powder
45-50 Miniature Candy Bars (the smallest, bite sized ones, not the fun size)

Instructions
Preheat the oven to 350 degrees.

Cream the butter, peanut or nut butter, sugar and brown sugar together in the bowl of a stand mixer fitted with the paddle attachment on medium speed until light and fluffy, about 5 minutes.  Add the eggs and vanilla and mix on low speed until just combined.  Add the flour, baking soda and baking powder and mix on low speed until just combined.

Take a small scoop of dough and flatten it in the palm of your hand.  Place a candy bar in the center and fold the dough around it.  Roll it in between your hands to form a smooth ball with the candy totally covered by the dough. 

Place on a sheet pan and bake for 10-12 minutes until golden brown and set.  Let them cool for a few minutes on the cookie sheet and place on a wire rack to cool completely.

Enjoy!
Julie

Wednesday, November 27, 2013

Baked Parsnip Fries & Happy Food Day

Happy Thanksgiving!  

Thanksgiving is the best food day of the year when I get to make and eat as much food as I want and no one is allowed to judge me.  I'm super excited about it.  However, I won't be sharing Thanksgiving recipes with you for a while because that's not the way I blog.

I'm really impressed by the all these bloggers who post all their holiday recipes before the holiday takes place.  Then on the day of the holiday they are posting ideas on how to help you eat the leftovers... I haven't even written my leftover Halloween candy posts yet.  While it's super convenient for readers like me who read the post and think it looks amazing and add it to my holiday menu, it can't possibly be convenient for the blogger.  Do they make two entire holiday dinners?  That or they save all their holiday posts to put out there early the following year.  I don't think the latter is true - I think they eat holiday dinners twice which come to think of it is an amazing idea considering that means not having to narrow down the number of dishes I get to make to a reasonable amount... 2 kinds of stuffing and 3 pies for 8 people is totally reasonable.

Alas, I did not make an early turkey-day dinner so you're stuck hearing about regular food until sometime in early December. 


Today we're talking about Parsnip fries which are the most authentic baked faux fries I've ever made.

I have a hereditary love of french fries and all other things that come adorned with ketchup but I get very irritated by alternative baked "fry" recipes that disappoint me with their not to crispy exterior.  Didn't we just talk about this a few days ago???

I'm not going to try and convince you that you won't know you're not eating the crispy spud but as far as faking it goes, parsnips come the closest.


I've made these a few times but this time made a mix of parsnips, carrots and sweet potatoes because that's what was lying around.  I found myself skipping sweet potatoes (which typically at least partially fulfill my fry craving) and the carrots (which just taste like roasted carrots) for the parsnips.  There is enough starch in them that they hold up well to the roasting process without getting too mushy.   The fact that they are the same color as a potato doesn't hurt - we do taste with our eyes first.

If you're looking for an alternative to those other fake baked fries, try the parsnip.  Even if you don't feel like you're eating a fry, at least it still tastes good with ketchup.


Baked Parsnip Fries

Ingredients
4 large Parsnips
1 T Olive Oil
1/2 tsp Salt
1/4 tsp Pepper

Instructions
Preheat the oven to 450 degrees.

Peel the parsnips and cut into sticks.  Spread the parsnips in a single layer on a baking sheet.  Drizzle with olive oil and sprinkle with salt and pepper.  Use your hands to toss the squash to evenly distribute the olive oil and seasonings.

Bake for 45 minutes stirring them around twice during the baking process until they are browned on all sides.
.
Serve with ketchup, obviously.

Enjoy!
Julie

Tuesday, November 26, 2013

Spaghetti and Meatballs

Comfort food continues today with a very traditional spaghetti and meatball recipe.

It took hours of contemplating for CA to figure out what he wanted for dinner.  We spend a lot of time in our house deciding what to eat and today was CA's choice because I didn't want to decide.  He mentioned meatballs early on but then diverted to stuffed shells, then curry, then Mexican (which is mentioned practically every day around here until CA decides that he doesn't want to eat until he's sick which is somehow inevitable when he eats Mexican food) and then "maybe we should just go out".  Eventually I said to him "we can have meatballs if you want" and he said "I guess that's OK."  It wasn't an enthusiastic response but at least I was released to go to the grocery store instead of staring at him until he decided.


This recipe is from Saveur magazine and it is surprisingly simple.  We've been subscribing to Saveur for years and I really love reading through the magazine and it's stories.  It's recipes, however, are typically complicated and sometimes written in ways that confuse and frustrate me.  This one, however is well written, doesn't contain anything super crazy and is quite delicious.  A definite keeper.
The meatballs are made from a mixture of ground beef, pork and veal.  I think the combination of meats adds to the flavor of these.  There is also quite a bit of cheese in here... provolone, ricotta and parmesan,  which is great because it's cheese and cheese is great. (The original recipe also has pecorino, but I left that out and put in more parmesan).  All the meatball ingredients get mixed together (with your hands please, that's the only way to mix meatballs) until just, rolled into balls, browned and they finish cooking in the sauce.

The original recipe called for making enormous meatballs, but I'm a fan of smaller meatballs because that means I can eat more than one and meatballs should at least come in pairs.  I ate three and I was stuffed!


The sauce is pretty simple too with whole canned tomatoes, garlic, a little sugar and dried spices that you probably already have in your pantry.  That all gets simmered together and then the browned meatballs are added and simmered a while longer until they are cooked through. I used more tomatoes than the original recipe called for because I like a lot of sauce on my pasta.  I also cut back a bit on the sugar, just enough to counteract the acidity in the tomatoes, but not enough that the sauce tastes sweet.

For the pasta, I opted to buy fresh pasta, but you can definitely use dried pasta.  I would have made my own fresh pasta if CA had decided what he wanted for dinner before 3PM but he had to settle for store bought fresh pasta.  He's got a rough life.


This is a really great, classic spaghetti and meatball recipe that is easy and relatively quick to execute.  The meatballs are very moist from the mixture of meats and because they finish cooking in the sauce so they don't dry out.  The sauce is a classic, flavorful marinara that tastes like you spent all day making it.


Spaghetti and Meatballs
adapted from Saveur
serves 8

Ingredients
1/4 cup Olive Oil
5 cloves Garlic, finely chopped
1 T Dried Parsley
1 T Dried Basil
2  35 oz. cans Whole Peeled Tomatoes, crushed
1/2 tsp + 1/4 tsp Salt, divided
1/4 tsp + 1/8 tsp Pepper, divided
3 T Sugar
10 oz. Ground Pork
5 oz. Ground Beef
5 oz. Ground Veal
1/3 cup Shredded Provolone
1/3 cup Ricotta
1/2 cup Grated Parmesan + extra for serving
3/4 cup Breadcrumbs
3 Eggs, lightly beaten
1 lb. Spaghetti, cooked

Instructions

Heat 2 T oil and 3 cloves chopped garlic in a 6-qt. saucepan over medium heat; cook until lightly browned, about 3 minutes. Add tomatoes, parsley, basil, 1/2 tsp salt, and 1/4 tsp pepper; cook for 15 minutes. Add sugar; cook until reduced and thick, about 15 minutes.

Combine the remaining 2 cloves of garlic, pork, beef, veal, provolone, ricotta, parmesan, breadcrumbs, eggs, 1/4 tsp salt, and 1/8 tsp pepper in a bowl.  Mix it with your hands until it just comes together (overworking the meatballs will make them tough).  Form into 16 meatballs, about 3 oz. each.

Heat remaining 2 T of oil in a 12″ skillet over medium-high heat. Working in batches, add meatballs.  Cook, turning, until browned, about 10 minutes. Transfer to sauce; cook until cooked through, about 30 minutes.

Serve meatballs and sauce over spaghetti; sprinkle with parmesan cheese.

Enjoy!
Julie

Monday, November 25, 2013

Chicken Pot Pie

My camera battery died right when I started cooking so you get iPhone photos today.  Sorry about that.

Comfort food is calling my name lately.  All I want is chili and stew and mac and cheese and all things roasted and red wine and bourbon drinks.  Falling leaves and CA building fires in the fireplace just make me want to curl up with something warm and comforting and there isn't anything more comforting than a bowl of chicken pot pie.
I did my best to load up the body of this chicken pot pie with veggies and to make the sauce with lighter ingredients too.  This pie is filled with onion, celery, chicken, zucchini, peas and corn.  I love the flavor that the mix of vegetables contributes to this recipe.

I also wanted to make sure that the chicken stayed nice and moist so I cooked the chicken by poaching it in stock.  Then I used that stock as part of the base of the sauce which means that all that wonderful chicken flavor is trapped inside the pie... I just pictured myself trapped in a pie and eating my way out.  That wouldn't be such a bad prison.
Despite what I consider to be excellent execution of the chicken pot portion of this chicken pot pie, I had some issues with the crust.  One of my intentions in making the pot pie was to use up some of the puff pastry scraps I've been saving in my freezer.  Typically when you make anything with puff pastry you end up with oddly shaped scraps and because of all the work it took for me to make all this puff pastry, I wasn't inclined to throw the in the trash so I've been collecting them.  

Once I cooked the chicken and sauteed the veggies and made the sauce, I topped all that with my puff pastry scraps and stuck it in the oven expecting the pastry to rise above into a beautiful browned pastry crown.  That did not happen.

Instead the pastry sunk into the base and didn't puff up or brown or anything.  It simply turned into a soggy mess.  I think this was because the pieces were so small - I'm pretty sure a large piece would have stood up to the test.  However, I didn't have any large pieces of dough so I scraped the soggy unpuffed pastry disaster off the top and set aside my deliciously creamy chicken and veggie base.  I then picked out a few more pastry scraps, put them on a baking sheet and baked them until they were beautifully browned and puffy.  I really should have just done this in the first place because a ladle of that creamy base and a little puff pastry hat in a bowl was absolute comfort food perfection!

Therefore, I recommend (and have adjusted the recipe instructions below to reflect this) keeping your chicken pie and your pie crust separate until serving.  It's best for everyone.

This recipe, as amended, is a really good one if I do say so myself.  It is creamy without being too heavy and the chicken flavor really comes through thanks to the stock.  I know what I'll be doing with the rest of the puff pastry scraps!


Chicken Pot Pie
6 servings


Ingredients
1 lb Boneless Chicken, breasts or thighs
2 cups Chicken or Vegetable Stock
1 T Olive Oil
1/2 Onion, finely diced (about 3/4 cup)
4 ribs Celery, chopped
3/4 cups Chopped Carrots
1/2 cup Corn (I used frozen)
1/2 cup Peas (I used frozen)
2 cloves Garlic, finely diced
1/3 cup Flour
1/4 cup White Wine
1 cup Milk (I used Skim)
1 tsp Thyme
1 tsp Salt
1/4 tsp Pepper
10 oz. Puff Pastry

Instructions
In a small pot, poach the chicken in the stock over low heat until the chicken is cooked through, about 30 minutes.  Let the chicken cool completely in the stock.  When the chicken is cool cut into bite sized pieces.  Reserve the remaining stock.

Preheat the oven to 400 degrees.  Spray a casserole dish with non-stick spray.

Heat the olive oil in a medium pot.  Add the onions, celery and carrots.  Saute until soft, about 10 minutes.  Add the peas, corn and garlic and saute an additional 2 minutes until the garlic is fragrant.  Add the flour and stir until thoroughly coating the vegetables.  Cook 2 minutes.  Add the wine and milk, thyme and one cup of the reserved stock.  Cook until the sauce thickens, about 30 minutes.  Add the cut up chicken and stir until combined.  Pour the mixture into the prepared dish.

Cut the puff pastry into 6 equal portions.  Place on a baking sheet.

Bake both the chicken mixture and the puff pastry at 400 degrees for 20-25 minutes, until the chicken mixture is bubbly and the pastry is browned and cooked through.

Spoon the chicken mixture into individual serving bowls and top with a piece of puff pastry.

Enjoy!
Julie

Sunday, November 24, 2013

Roasted Delicata Squash

The original recipe for this is titled Roasted Delicata Squash Fries.  I find that to be a stretch, but I'm pretty picky about my fries.  I appreciate that you can put ketchup on these if you want to (but, then again, you can put ketchup on almost anything) but I wouldn't go so far as to call them fries.
However, that does not mean that I'm not a huge fan of this recipe.  I love all squashes - yellow, butternut, acorn, spaghetti, etc. but I can't remember having delicata squash before.   You can find it in the bin at the grocery store with all the other squashes, it's long and stripey and hopefully has a sticker on it that tells you what it is.

I am officially renaming this the lazy man's squash AKA my new favorite squash because you don't have to peel it.  Being able to eat the skin is amazing because peeling squash is a beast.  I've broken three peelers trying to peel butternut squash which I believe is the ultimate test of a peeler.  The ultimate test of my sanity is that I bought the same peeler three times only to break each one on a butternut squash before deciding to get a different kind of peeler.  In my defense, before the peeler broke (3 times) it was the best peeler I ever owned.  This new one isn't nearly as good, but it hasn't broken yet.


This recipe is embarrassingly easy (cut up squash, drizzle with olive oil, sprinkle with salt and pepper and bake) but I guess the whole point of this post is to tell you that if you're looking for a new squash pick up the delicata.

The flavor of these is really great - similar to butternut squash but not quite as sweet.  The skin softens up and the roasting brings out their natural sweetness.  I have a feeling this squash is going to make it into the regular rotation around here.


Roasted Delicata Squash
adapted from The Simple Veganista
Serves 4

Ingredients
2 Delicata Squash
1 T Olive Oil
1/2 tsp Salt
1/4 tsp Pepper
Sprinkle of Cayenne (optional)

Instructions
Preheat the oven to 500 degrees.

Cut each squash in half lengthwise.  Scoop out the seeds.  Cut into 1/2 inch slices.

Spread the squash in a single layer on a baking sheet.  Drizzle with olive oil and sprinkle with salt and pepper.  Use your hands to toss the squash to evenly distribute the olive oil and seasonings.

Bake for 10 minutes.  Flip over each slice and bake for another 10 minutes until both sides are nicely browned.


Enjoy!
Julie

Thursday, November 21, 2013

Zucchini Fritters

CA has been complaining that we eat the same boring vegetables all the time.  I'll admit that we eat a lot of roasted broccoli, roasted brussels sprouts, sauteed squash and steamed green beans.  However, in my defense, during the week I don't have a lot of time to come up with some new and creative vegetable dish.  Plus, on weekdays I try my best to eat in a healthy way (don't judge a girl's health status by her blog posts) and the simplest vegetable dishes often have the least calories and allow me to stuff large amounts of them in my face so that I'm full and don't eat a lot of more unhealthy items.  I'm no fun when I'm hungry.

To appease his veggie boredom, I decided to make zucchini fritters on this particular weekEND night.
I looked at at least 10 recipes online and then closed the laptop and decided to wing it.  It turns out there is a LOT of water in zucchini so the common theme in all of the recipes I read was that you have to get as much water as possible out of the zucchini or you'll end up with a soggy mess. 

I wanted to keep things simple so the only flavorings I added to the fritters were salt and pepper and sauteed onions.  Oh yeah, and a little cheese because you can't have fritters without cheese.  It's a rule that I just made up.
The fritters get fried up in a little bit of oil.


The verdict?  CA loved these.  He thought they were like the zucchini version of creamed spinach.  Not quite what I was going for, but if he's happy, I'm happy... especially considering I made these for him.

Me?  I thought the flavor was really good but I wanted them to be crispier.  I think the lack of crunch is a function of me not squeezing enough water out of the zucchini.  Squeeze that zucchini like your life depends on it.


Zucchini Fritters
Yields 6-8 Fritters

Ingredients
3 Medium Zucchini
1/2 onion, finely chopped (about 1/2 cup)
1 T + 1/2 cup Canola Oil, divided
1/4 cup grated Parmesan Cheese
1 Egg
1/4 cup Flour
3/4 tsp Salt
1/4 tsp Pepper


Instructions
Grate the zucchini, wrap it in three layers paper towels and squeeze to release the water.  You'll have to repeat the process a few times to remove as much water as possible.  Add the zucchini to a medium mixing bowl.

Heat 1 tablespoon of oil in a non-stick skillet over medium heat.  Add the onion and saute until soft, about 5 minutes.  Add the cooked onion to the mixing bowl.

Add the cheese, egg, flour, salt and pepper to the mixing bowl and mix well.  Gently form the zucchini mixture into 6-8 patties, about 1/2" thick.

Heat the remaining canola oil in the same nonstick skillet over medium heat.  Working in batches, fry the patties in hot oil until browned and crisp, 3-4 minutes per side.

Transfer the fritters to paper towels to let drain.


Enjoy!
Julie

Wednesday, November 20, 2013

Baking Bouchon - Recipe 67: Almond Croissants

This is last in the series of croissants and yet another one I haven't eaten before.  I must not be eating enough croissants.  Not that it's an issue now because I've eaten more croissants in the last 48 hours than I've eaten in the last five years.  (That was written with a big ole' grin on my face.)

I am pleased that Thomas gave these an everyday name, even if they are subtitled in French as Croissants aux Amandes, because the simplicity of them matches the plainer name.  That is not to say that they're not wonderful... sometimes simpler is better.
There are four components to these croissants.
1.  A traditional croissant - self explanatory
2.  Almond Syrup - almond flour steeped in sugar water then strained to create a lovely almond flavored syrup.  It would have been far easier to flavor simple syrup with almond extract but I have a feeling that almond extract isn't stocked in the Bouchon Bakery's pantry.
3.  Almond Cream - which I've made several times before (it's prominently featured in the Pear Feuillette and Plum Tarts).  It is a combination of almond flour, regular flour, butter, powdered sugar and eggs that is whipped together into a fluffy almond flavored pastry cream.
4.  Sliced almonds - also self explanatory.

Assembly works as follows... the croissants are sliced in half, both sides are brushed with almond syrup, almond cream is spread on one side of the croissant and topped with the other, a small amount of cream is spread on top and then the top is sprinkled with almonds.  All that gets baked for a bit to seal it all together and toast the almonds.
These emerged from the oven with beautifully toasted almonds on top and my house smelled like almond deliciousness.

I'm a huge fan of these.  They're got the same buttery flavor and flaky texture of traditional croissants with a rich almond flavor.  The cream inside kind of melts into the croissants when it's baked so it's one cohesive treat.  The almonds on top just add a bit of crunch and texture.  They're delightful!


I have a very hard time deciding which of the croissants were my favorite.  The raisin version is out of the running for obvious reasons.  The traditional croissants are the breakfast winner, but I'm torn between the almond and chocolate for dessert.  I was really surprised by how much I like the almond version.  When I worked in the bakery we made almond croissants very similar to these and they never appealed to me so I never ate them.  I wonder if they were this delicious.  Maybe I need to go back and try them... but then I'll probably just get lured in by quiche and scones.

Enjoy!
Julie

Tuesday, November 19, 2013

Baking Bouchon - Recipe 66: Pains aux Raisins

Despite its pretentious name, these are raisin croissants.  If I hadn't committed to making everything in this book, I would not have made these.  Must we rehash my dislike of raisins?  Let's not.
The croissant dough here is the same as traditional and chocolate croissants.  You actually use half a batch of croissant dough to make these ten pastries.  The dough gets rolled out and spread with a thin layer of pastry cream which I whipped up the day before.  Having made the pastry cream a half dozen times now, I'm finally getting the hang of it and this was best best batch yet.  On top of the pastry cream goes a boatload of raisins....

Sigh...

Ugh...

I used golden raisins because that's what we had in the house and they are slightly less repulsive than purple raisins.  The only redeeming quality about these raisins is that they are soaked in a rum simple syrup.  Rum makes them slightly less offensive.
All of that gets rolled up and sliced into individual portions - kind of like a cinnamon roll.  The rolls get brushed with egg wash and proofed for a couple of hours.


These baked up light and golden and quite pretty.  I ate a bite of one to tell you that I did.  It wasn't terrible, but I didn't eat any more.  CA ate them for breakfast and liked them, but even he admitted this wasn't his favorite of the croissant quad.


I sent most of these away.   The photo below reflects how my kitchen counter typically looks on Sunday nights as I'm sorting baked goods into keep and give away containers for two workplaces.  Don't you wish you worked with us?

I'm so grateful there is one more croissant recipe to share with you so that we don't have to end on a shriveled up sour note.


Enjoy!
Julie

Monday, November 18, 2013

Baking Bouchon - Recipe 65: Pains au Chocolat

What's better than light, flaky, buttery croissants?  Those same croissants with chocolate.

I never pick chocolate croissants when I'm hitting up a bakery for breakfast.  I actually can't remember ever eating a chocolate croissant, although it can't possibly be true that I've never had one.  I'll usually opt for a muffin or scone if I'm going for a sweet breakfast pastry.  I'm not a chocolate for breakfast kind of girl.

These facts haven't changed, but I am now obsessed with chocolate croissants... for dessert.
Yesterday we went through the whole croissant dough making process, the whole butter block encasing process and the whole rollin', rollin', rollin' process.  Today we get to skip right over that because chocolate croissants (I can't call them pains au chocolat like Thomas Keller does because it's too pretentious and while I am a food snob I try my best not to be pretentious) are made exactly the same way as regular croissants until it comes to the cutting and rolling part.

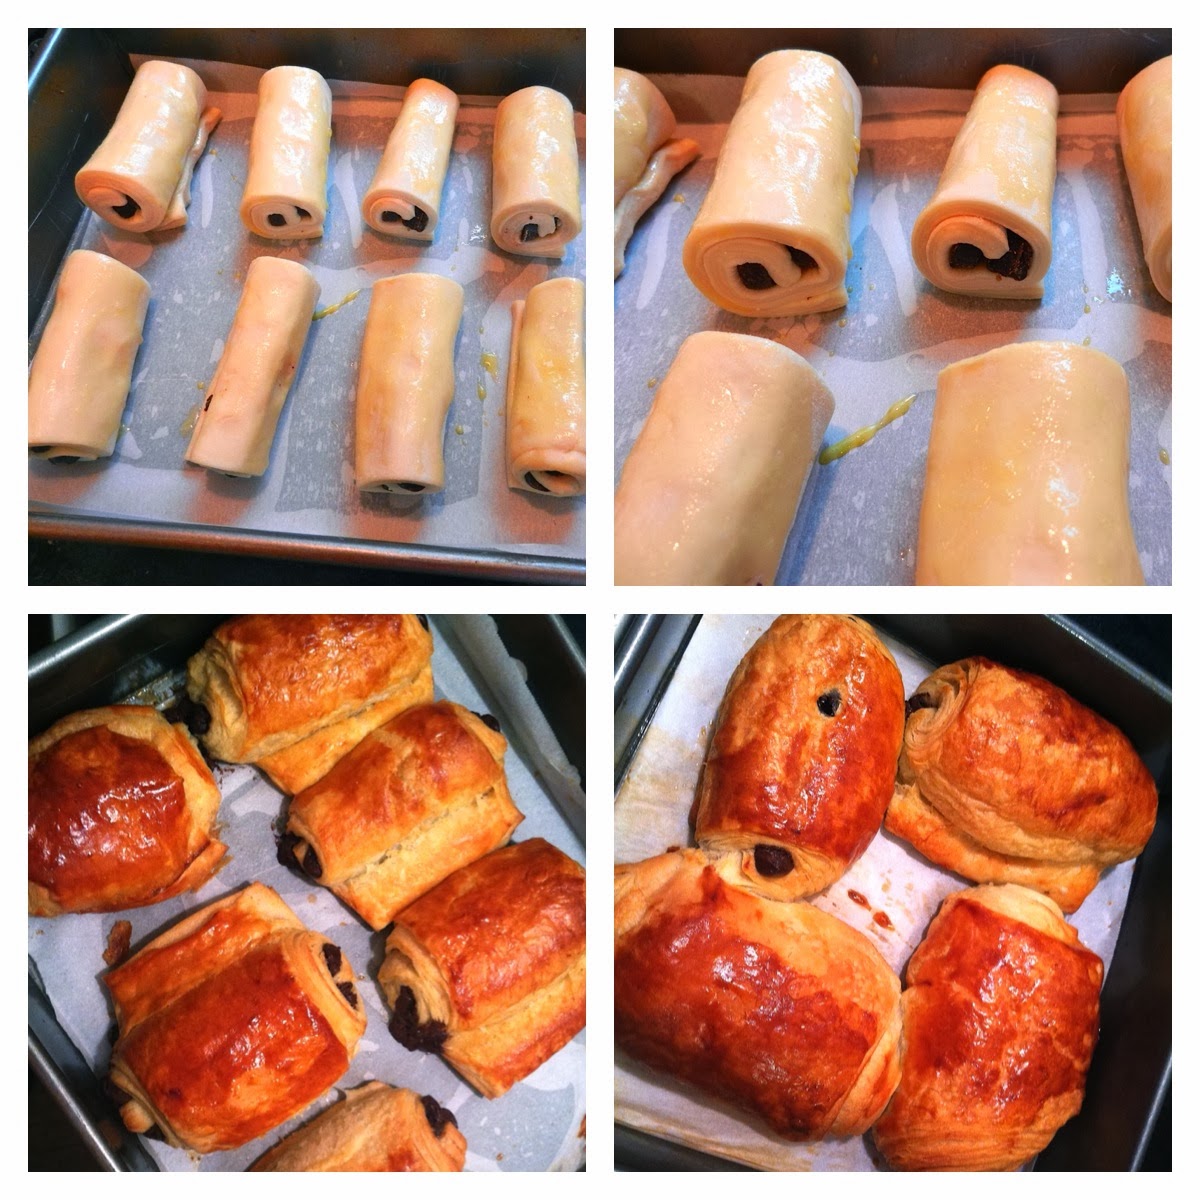
For these the dough gets rolled out and cut into rectangles.  Each rectangle gets a chocolate baking stick and a brush of egg wash to help it stick together.  The chocolate is semi-sweet so it's not crazy sweet which I appreciate (especially if you do opt to eat these at breakfast).  I couldn't find the sticks in my local stores so I ordered them online at King Arthur Flour.  My only word of advice is not to order them when it's hot outside.  Not that I know anything about that.  All that gets rolled up into a pretty little log.

By the way, if you want to cheat and make easy chocolate croissants - just roll one of these sticks up inside a crescent roll.  Done.  Heck, just put some chocolate chips in there.  I, however, like to make things more difficult.
The rolls get brushed with more egg wash and proofed for a couple of hours.  Then they go straight into the oven.  Because I baked the regular croissants first, I knew I wouldn't have any trouble with these so I didn't stalk the oven window during the baking process.

The result is a beautifully browned, light, flaky, buttery pastry that envelopes a creamy, slightly sweet chocolate center.  These are amazing and totally worth all the work.


My only minor complaint is that some of them unrolled a little bit during the baking process so they're not all tight little rounds, but I'm full of aesthetic forgiveness when something tastes this good.

I can't say that I've been converted to a chocolate croissant for breakfast type of person because I was so busy eating regular croissants for breakfast to eat these at the same time.  I did however eat them for dessert for a few days and was a huge fan.


Enjoy!
Julie

Sunday, November 17, 2013

Baking Bouchon - Recipe 64: Traditional Croissants

Croissants are one of the reasons I decided to bake my way through the Baking Bouchon cookbook.  I've always wanted to make them but I figured they were way too difficult.  I thought that about puff pastry too which I've successfully executed (kind of) and this is fundamentally the same thing (butter wrapped in dough, rolled and folded to create layers) so I had a lot of confidence going into this recipe.

I know we just got off 2 whole weeks on the same theme and you were expecting variety to make a comeback here this week but when I decided it was time to make croissants I went all in and made all four kinds of croissants in the cookbook at the same time.  The process of folding and rolling the dough takes a lot of time and I decided it was easier to do it all at once.  Therefore, you get 4 days of croissants. 

We start at the beginning with the classic croissant.  The dough for all four types of croissants is made the same way but some recipes call for less dough than others, so I made 3 batches.

It starts with a poolish, which we've discussed when making bread.  It turns out that croissant dough is more like bread dough than pastry dough because it contains yeast which contributes to the rise (as opposed to puff pastry which gets its height only from the layers).

The poolish, or starter, is made from flour, yeast and water which is left at room temperature for 12-15 hours so the yeast have time to get all bubbly and active.


The rest of the ingredients in the dough are more flour, more yeast, more water, a little sugar, a little butter, a little salt and teaspoon of diastatic malt powder.  I've been trying not to go nuts buying random ingredients, particularly those that I only need a teaspoon of, but I wanted these croissants to be perfect so I ordered this powder on the Internet.  (King Arthur Flour has been a good resource for me for all kinds of random baking things.)  I didn't do any research on this stuff but the label says it makes breads have better crust, rise and texture.  I'm sure this has to do with science and theirs is not to reason why.

The dough gets kneaded in the stand mixer for twenty minutes.  Because I made 3 batches at the same time, this meant that my mixer was running for an hour which meant that it was really freakin' hot.  I was worried it would die (it's been making straining sounds every since I overloaded it with so much cookie dough it couldn't move) that I kept putting cold washcloths on it like it had typhoid.  CA said it was a really smart idea and considering it didn't start smoking, I guess it helped.

The dough then rises for an hour, is rolled in to a rectangle and frozen for 20 minutes until it's nice and firm.

Next up is the butter block where I take three sticks of butter and make them into one giant butter pat which is awesome.  It involves pounding it and rolling it until it's stuck together and then trimming it and rolling again to get a nice rectangle.  The butter block gets chilled again to make sure it's nice and firm

Now it's time to encase the butter in dough so you roll the dough out into a nice long rectangle, place the butter in the middle and wrap it up like a butter gift.  I might be the only person who would love to unwrap a box of butter.  I also wouldn't mind be wrapped in a dough blanket either.
Next comes hours of chilling the dough, rolling it out into a long thin rectangle and folding it into thirds.  This process gets repeated 3 times for 3 batches of dough so 9 times.  Oh yeah, and then you roll it out again before you cut it so let's make that 12 times.  Needless to say that my hands hurt.  Embarrassingly my abs hurt.  If you ever want evidence that you're out of shape you should get sore abs from baking.  It's ridiculous. 

Did I tell you it took me 3 days to make all these?
Now that I'm thoroughly exhausted just remembering the rolling process, it's time to shape these into croissant shapes.

For the traditional croissant shape the dough is cut into triangles.  The triangles get stretched lengthwise and rolled into crescents.  Thomas tucks in the ends of the bottom of each triangle on his croissants before rolling instead of wrapping them around the front of the croissant.  I have no feelings either way about this.


The rolled croissants are then brushed with egg wash and left to proof for 2 hours.  This happened on my dining room table on every baking pan I have in the house because I don't have enough sheet pans to hold 50 croissants.  It's times like this that I like to point out to CA that I actually do need more kitchen equipment.

The instructions in this cookbook don't indicate what the proofed dough should look like, just that an impression should remain if the dough is pressed gently.  I waited for the croissants to really rise and get bigger but that never really happened so a few hours later I decided it was time to go ahead and bake them.

The croissants get brushed with egg wash again (there's no way these guys won't get golden brown) and popped into the oven.


I spent the majority of the 40 minute baking time staring through the window of the oven.  I was so nervous that they wouldn't turn out right but they were freaking beautiful!!!!


Not only were they beautiful but they taste amazing too - just as good as something you'd buy in a bakery.  I couldn't be prouder of these guys.  They shatter when you break them apart just like you want a flaky croissant to do.   They're light and taste amazing by themselves or with a little butter and jam.

CA and I ate a lot of them, took a lot to work and also froze a few for future enjoyment.  People actually asked if we bought them which I took as a compliment.


Can you tell that I'm proud of myself?  Well, I am.

Variations on this theme continue tomorrow.  Did someone say chocolate?

Enjoy!
Julie

Thursday, November 14, 2013

Pumpkin Truffles

I have mixed emotions about the fact that pumpkin weeks are over.  On one hand I feel like there are so many great pumpkin recipes that I haven't had the chance to make.  I haven't even made pumpkin pie and pumpkin pie is the epitome of pumpkin desserts. (Although, I will be making and sharing my favorite pumpkin pie with you once I make it for Thanksgiving.)  On the other hand, I'm ready to mix it up and talk about other foods on the blog.

CA does not have mixed emotions - he's totally over pumpkin.


I had a hard time deciding what to make for the final pumpkin recipe.  I have a few more recipes that I've made an enjoyed before (pumpkin biscotti, pumpkin pie, pumpkin dip, pumpkin bread, pumpkin muffins) but I wanted to try another new recipe.  I'll just have to revisit pumpkin again at a later date.

I haven't made balls of any sort since I made hundreds of them for my friend's wedding.  I needed a ball break, similar to the pumpkin break I'm taking after today.  It's not that making balls is difficult, but it is awfully time consuming dipping balls in chocolate.  I did however, miss the innuendo that comes with having the word balls in every sentence I write.  I guess I could just call them truffles but that wouldn't be nearly as fun.

The pumpkin centers of these truffles are made from melted white chocolate, pumpkin puree, graham cracker crumbs, cream cheese and powdered sugar.  The great part about how these are made is that you just throw everything in the food processor and whiz it up until it's nice and smooth.

The only problem is that you then have to refrain from eating it all before you get a chance to cover it in chocolate.  If you have judgmental eagle eyes  you will see the imprint of my finger running through the filling in the picture to the left.

The mixture is very soft due to the soft cream cheese and melted white chocolate so it has to rest in the refrigerator for a few hours before it's hard enough to roll into balls.  I actually lost track of time and ended up leaving mine in the fridge overnight which was fine except that every time I opened the fridge I stuck a spoon in it.


Once the insides were scooped and rolled into balls, they managed to soften up so they needed to be chilled again before they are dipped in chocolate.

I had some trouble dipping these - the bottom kept sticking to the fork I used for dipping so I couldn't get them off the fork without mangling them.  I rectified this by holding each one between my fingers, dipping one side in the chocolate and sticking them in the fridge until the chocolate hardened.  Then I dipped the whole thing in chocolate again.  The already hardened first layer of chocolate was hard enough to keep it from sticking to the fork .  It worked perfectly!


These are some of my favorite balls of all time.   The insides are super creamy and the pumpkin flavor is prominent.  The biggest surprise for me was how much I loved the flavor of the graham crackers in the mixture.  It added such a great buttery and spicy element (not hot spicy, spices spicy).  All of this also paired perfectly with the chocolate.  I can't say enough good things about these.

My coworkers were super impressed by these.  In fact,  someone walked by my office holding one and exclaimed "What is in these?"  In a good way.

Now that pumpkin week is over you can expect more variety on the blog until I come up with another obsession.  Peppermint?  Cranberries?  Who knows.


Pumpkin Truffles
Adapted from Smile Sandwich
Makes 18 truffles (you should double it, I did!) 

Ingredients
1/2 cup White Chocolate Chips
1/4 cup Pumpkin Puree
2/3 cup Graham Cracker Crumbs
1 oz. Cream Cheese
1/4 cup Powdered Sugar
5 oz. Chocolate Candy Melts
2 tsp Shortening


Instructions
Melt the white chocolate in a microwave safe bowl for 60 seconds.  Remove from the microwave and stir.  Continue microwaving in 15 second intervals, stirring in between, until the chocolate is melted.

Add the melted white chocolate, pumpkin puree, graham crackers, cream cheese and powdered sugar to a food processor.  Blend until the mixture is completely smooth.  Refrigerate the dough for 3 hours or overnight until firm.

Scoop and roll the dough into 1 inch balls.  Place on a waxed paper lined baking sheet and freeze for 15 minutes until firm.

Place the chocolate candy melts and shortening in a microwave safe bowl.  Microwave for 60 seconds, remove from the microwave and stir.  Continue microwaving in 30 second intervals, stirring in between, until the chocolate is melted.You don't want to use a huge bowl because you want the chocolate to be a few inches deep to make dipping the truffles easier. (I found that a cereal bowl works well).

Dip each ball in chocolate and set it back on the waxed paper lined baking sheet.  Let sit at room temperature until the chocolate hardens.  Store in the refrigerator until ready to eat.


Enjoy!
Julie

Wednesday, November 13, 2013

Pumpkin Oreo Cheesecakes

Pumpkin cheesecake is a classic.  I've had quite a few good and some not so good pumpkin cheesecakes.  Although, let's be honest that combining cream cheese, sugar and pumpkin is a good idea.  You have had pumpkin dip haven't you???  I do could eat that with a spoon.


I was initially a little skeptical of this recipe.  While I've baked more with Oreo cookies on this blog than I ever thought I would, I realized one thing.  People LOVE Oreo cookies.  Anytime I put them in something people go nuts.  I'm not cuckoo for Oreos so I don't quite understand this phenomenon, but I've been trying to embrace it.

I think my initial reservations came from the fact that I firmly believe that cheesecakes belong on graham cracker crusts (the same goes for key lime pie).  However, when I mentioned this recipe to a good friend of mine and to CA, their eyeballs got larger than normal so I took that as a good sign and put it on the pumpkin week agenda.

The cheesecake portion of this dessert is pretty standard... cream cheese and sugar are whipped together until really fluffy, then the eggs go in followed by pumpkin, spices and sour cream.

I love sour cream in cheesecake - it really keeps it from being too dense and enhances all the other flavors.  Alton Brown's Sour Cream Cheesecake recipe is one of my favorites (I tried to use it to make cheesecake balls, but it was too soft for this purpose - making it perfect for regular cheesecake)


The great thing about these cheesecakes is that they are miniature - which means they're great for sharing (and you know I love that!) 

The base is one side of an Oreo cookie popped into a cupcake liner.  I put the side with the cream on the bottom because that seemed like the best thing to do.  I'm not sure why nor am I sure that it makes a difference because after they were baked I couldn't identify the cream - I think it just melts pumpkin cheesecake filling.

Not only do these get an Oreo base but they also get an Oreo topper courtesy of the non-cream side of the Oreo. 

They are like little pumpkin cheesecake sandwiches which makes them super easy to eat while holding them between your fingers.

These sweet sandwiches baked up nice and fluffy.  Even after removing the cupcake liners, both Oreo sides stayed put (for some reason I thought they would try to fall off).

In hindsight I have seen cheesecakes with a chocolate crumb base and this method of putting the whole cookie in a muffin pan is ten times easier than grinding up the cookies only to mush them back together again in crust form.

The combination of Oreo cookies and pumpkin cheesecake is pretty darn delicious.  I'm the only one who was surprised by this fact, CA expected them to be great and he liked them too (although it's possible he didn't get his allotted share because I ate them).  I love that they are individually sized and that the cheesecake layer is super light. 


The recipe can be found at Inside BruCrew Life.  I followed it exactly.

Enjoy!
Julie